Transferring photos onto plexiglass has become increasingly popular in recent years. This unique art form allows individuals to showcase their favorite images in a visually stunning and modern way. In this blog post, we will explore the techniques and tips for mastering the art of transferring photos onto plexiglass.
Purpose of the Blog Post
The purpose of this blog post is to provide readers with valuable insights and guidance on how to successfully transfer photos onto plexiglass. Whether you are a beginner or an experienced artist, this post aims to equip you with the necessary knowledge and techniques to create beautiful and professional-looking plexiglass photo transfers.
Benefits of Plexiglass for Photo Transfers
Plexiglass, also known as acrylic glass, offers several advantages for photo transfers. Firstly, it is a lightweight and durable material, making it easy to handle and display. Additionally, plexiglass has excellent optical clarity, allowing the transferred photo to appear vibrant and sharp. Unlike traditional glass, plexiglass is shatter-resistant, making it a safer option for displaying photos.
Understanding the Different Types of Plexiglass
When it comes to photo transfers onto plexiglass, the type of plexiglass used can significantly impact the final result. There are various types available, including clear, frosted, and colored plexiglass. Clear plexiglass allows for a transparent transfer, while frosted plexiglass creates a softer and diffused effect. Colored plexiglass, on the other hand, adds a unique and artistic touch to the transferred photo.
Necessary Tools and Materials
Before diving into the photo transfer process, it is essential to gather the necessary tools and materials. Some of the essential items include a plexiglass sheet, a high-quality photo print, transfer medium (such as gel medium or Mod Podge), a brush or roller for application, sandpaper for sanding the edges, and a protective sealant. Having these tools and materials ready will ensure a smooth and successful photo transfer process.
Stay tuned for the next section of this blog post, where we will discuss the process of preparing the photo for transfer onto plexiglass.
Understanding the Materials
When it comes to transferring photos onto plexiglass, it is important to have a good understanding of the materials involved. Plexiglass, also known as acrylic glass, is a lightweight and durable material that is commonly used in various applications, including photo transfers. Here, we will delve into the different aspects of plexiglass and its impact on the final result of your photo transfer project.
What is Plexiglass?
Plexiglass is a type of transparent plastic that is similar to glass in appearance but has several advantages. It is shatter-resistant, making it a safer alternative to traditional glass. Plexiglass is also lightweight and can be easily cut into different shapes and sizes, making it highly versatile for various artistic projects.
Types of Plexiglass
There are different types of plexiglass available, each with its own characteristics and impact on the final result of your photo transfer. Here are a few common types:
-
Clear Plexiglass: This is the most commonly used type of plexiglass for photo transfers. It provides a clear and transparent surface, allowing the transferred photo to shine through without any distortion.
-
Frosted Plexiglass: If you prefer a more diffused and softer look for your photo transfer, frosted plexiglass is a great option. It adds a subtle texture to the surface, giving your transferred photo a unique and artistic touch.
-
Colored Plexiglass: For those who want to add a pop of color to their photo transfer, colored plexiglass is an excellent choice. It comes in a variety of vibrant hues, allowing you to create visually striking and eye-catching pieces.
Necessary Tools and Materials
To successfully transfer photos onto plexiglass, you will need a few essential tools and materials. Here is a list of what you will need:
-
Plexiglass: Choose the type and size of plexiglass that suits your project.
-
Photo: Select a high-quality photo that you want to transfer onto the plexiglass. Ensure that the photo is printed on photo paper for the best results.
-
Gel Medium or Mod Podge: These are adhesive substances that help in transferring the photo onto the plexiglass.
-
Brushes: Use brushes to apply the gel medium or Mod Podge onto the plexiglass and photo.
-
Sanding Paper: Sanding the edges of the plexiglass will give it a smooth and polished finish.
-
Primer or Base Coat: Applying a primer or base coat before transferring the photo can improve adhesion and enhance the final result.
Having these tools and materials ready will ensure a smooth and successful photo transfer process.
Understanding the materials involved in transferring photos onto plexiglass is crucial for achieving the desired outcome. By familiarizing yourself with the different types of plexiglass and gathering the necessary tools and materials, you are setting yourself up for a successful photo transfer project. In the next section, we will explore the process of preparing the photo for transfer onto plexiglass.
Preparing the Photo
Preparing the photo is a crucial step in transferring photos onto plexiglass. By selecting the right photo and enhancing its quality, you can ensure a successful and visually appealing transfer. Here are some tips to help you prepare your photo for the process:
Selecting the Right Photo for Transfer
When choosing a photo for transfer, consider the following factors:
-
Clarity and Resolution: Select a photo that is clear and high-resolution. This will help ensure that the transferred image is sharp and detailed.
-
Composition: Look for a photo with a strong composition and interesting subject matter. Consider the balance, colors, and overall aesthetic appeal of the image.
-
Contrast and Lighting: Photos with good contrast and lighting tend to transfer well onto plexiglass. Avoid photos that are too dark or too bright, as they may result in a less desirable outcome.
-
Emotional Connection: Choose a photo that holds personal significance or evokes emotions. This will make the final transferred image more meaningful to you and others who view it.
Tips for Enhancing the Photo’s Quality and Resolution
To enhance the quality and resolution of your photo, consider the following tips:
-
Editing Software: Use photo editing software to adjust the brightness, contrast, and saturation of the image. This can help improve the overall appearance of the photo.
-
Noise Reduction: If your photo has any visible noise or graininess, use noise reduction tools to smooth out the image. This will result in a cleaner and more professional-looking transfer.
-
Sharpening: Apply a sharpening filter to enhance the details and edges of the photo. Be careful not to over-sharpen, as this can create an unnatural and pixelated effect.
-
Cropping and Framing: Consider cropping the photo or adding a frame to enhance its composition and focus. This can help draw attention to the main subject and create a visually appealing transfer.
Adjusting the Photo’s Size and Orientation for the Plexiglass Canvas
Before transferring the photo onto plexiglass, you may need to adjust its size and orientation to fit the canvas properly. Here’s what you need to consider:
-
Resizing: Measure the dimensions of your plexiglass canvas and resize the photo accordingly. Ensure that the photo is neither too small nor too large for the canvas to achieve the desired effect.
-
Orientation: Decide whether you want the photo to be displayed in portrait or landscape orientation. Rotate the image if necessary to match the orientation of the plexiglass canvas.
-
Aspect Ratio: Maintain the original aspect ratio of the photo to avoid distorting the image. This will help preserve the proportions and ensure a more accurate transfer.
By following these tips and techniques, you can effectively prepare your photo for transferring onto plexiglass. Remember to choose a photo that holds personal significance, enhance its quality using editing software, and adjust its size and orientation to fit the canvas. These preparations will set the foundation for a successful and visually stunning transfer onto plexiglass.
Preparing the Plexiglass
Preparing the plexiglass surface is a crucial step in the process of transferring photos onto plexiglass. Proper preparation ensures better adhesion and a polished look for the final result. In this section, we will discuss the necessary steps to prepare the plexiglass for photo transfer.
Cleaning and Prepping the Plexiglass Surface
Before starting the photo transfer process, it is essential to clean the plexiglass surface thoroughly. Any dirt, dust, or fingerprints on the surface can affect the adhesion of the photo and result in an imperfect transfer. Here are the steps to clean and prep the plexiglass:
- Use a mild soap or dishwashing liquid and warm water to create a cleaning solution.
- Gently wash the plexiglass surface using a soft cloth or sponge. Avoid using abrasive materials that can scratch the surface.
- Rinse the plexiglass with clean water to remove any soap residue.
- Dry the surface completely using a lint-free cloth or paper towels.
By ensuring the plexiglass surface is clean and free from any contaminants, you create an ideal environment for the photo transfer process.
Applying a Primer or Base Coat
To enhance the adhesion of the transferred photo, applying a primer or base coat is recommended. The primer creates a smooth surface and helps the photo adhere better to the plexiglass. Here’s how to apply a primer or base coat:
- Choose a primer or base coat that is suitable for plexiglass. Acrylic-based primers or spray primers work well for this purpose.
- Ensure the plexiglass surface is clean and dry before applying the primer.
- Apply a thin and even layer of primer using a brush or spray. Follow the manufacturer’s instructions for the specific primer you are using.
- Allow the primer to dry completely before proceeding with the photo transfer process.
Applying a primer or base coat not only improves adhesion but also provides a more even and professional-looking finish to the transferred photo.
Sanding the Edges
To achieve a polished and refined look for your plexiglass photo, it is essential to sand the edges. Sanding helps remove any rough or uneven edges, giving the photo a smooth and professional appearance. Here’s how to sand the edges of the plexiglass:
- Use fine-grit sandpaper (around 400-600 grit) for sanding the edges.
- Hold the sandpaper at a slight angle and gently sand the edges in a circular motion.
- Continue sanding until the edges feel smooth and have a polished finish.
- After sanding, wipe away any dust or debris using a clean cloth or compressed air.
Sanding the edges of the plexiglass not only enhances the visual appeal but also ensures a safe and comfortable handling experience.
By following these steps to prepare the plexiglass, you create an optimal surface for transferring photos. Cleaning the surface, applying a primer or base coat, and sanding the edges contribute to a successful and professional-looking photo transfer onto plexiglass.
In the next section, we will explore different methods of transferring photos onto plexiglass and provide step-by-step instructions for each method. Stay tuned for more tips and techniques to master the art of photo transfer onto plexiglass.
Transferring the Photo
Transferring photos onto plexiglass is a captivating art form that allows you to create unique and visually stunning pieces. In this section, we will explore different transfer methods and provide step-by-step instructions to help you achieve seamless and high-quality results.
Exploring Different Transfer Methods
When it comes to transferring photos onto plexiglass, there are several methods you can choose from. Each method offers its own advantages and produces distinct effects. Here are three popular transfer methods:
-
Gel Medium: Gel medium is a versatile and widely used transfer medium. It works by transferring the ink from a printed photo onto the plexiglass surface. Gel medium can create a transparent and glossy finish, allowing the photo to blend seamlessly with the plexiglass.
-
Mod Podge: Mod Podge is another popular transfer medium that provides a slightly different effect. It is a glue-like substance that can be used to adhere the photo onto the plexiglass. Mod Podge dries clear and can create a textured and vintage look, adding character to your transferred photo.
-
Heat Transfer: Heat transfer involves using heat and pressure to transfer the photo onto the plexiglass. This method requires a heat press machine or an iron. Heat transfer can produce vibrant colors and sharp details, making it an excellent choice for high-resolution photos.
Step-by-Step Instructions for Each Transfer Method
Regardless of the transfer method you choose, here are some general step-by-step instructions to guide you through the process:
-
Prepare the photo: Start by printing your chosen photo on a high-quality printer using photo paper. Ensure that the photo is the desired size and orientation for the plexiglass canvas.
-
Prepare the plexiglass: Clean the plexiglass surface thoroughly using a mild detergent and water. This will remove any dirt or dust particles that could affect the transfer. Dry the surface completely before proceeding.
-
Apply the transfer medium: Depending on the method you selected, apply a thin and even layer of gel medium or Mod Podge to the plexiglass surface. If using heat transfer, place the photo face down on the plexiglass.
-
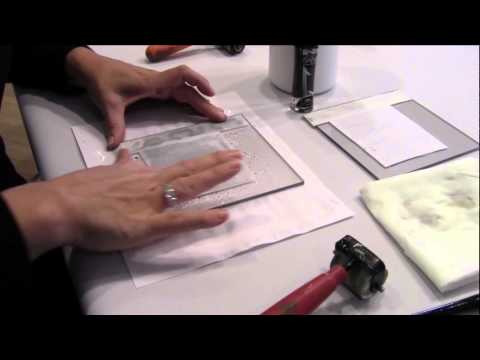
Smooth out any air bubbles: Use a squeegee or a flat-edged tool to gently press the photo onto the plexiglass, starting from the center and working your way outwards. This will help eliminate any air bubbles or wrinkles.
-
Allow the transfer to dry: Follow the recommended drying time for the specific transfer medium you are using. This will ensure that the photo adheres properly to the plexiglass.
-
Remove the backing: If you used gel medium or Mod Podge, once the transfer is dry, dampen the paper backing with water and gently rub it off using your fingers or a soft cloth. If you used heat transfer, carefully peel off the backing paper.
-
Protect the transferred photo: Apply a protective layer, such as a clear varnish or acrylic sealer, over the transferred photo. This will safeguard it from scratches and fading, ensuring its longevity.
Tips for Achieving a Seamless and High-Quality Transfer
To achieve the best results when transferring photos onto plexiglass, consider the following tips:
-
Choose the right photo: Select a photo with good contrast, sharp details, and vibrant colors. This will enhance the overall quality of the transferred image.
-
Experiment with different transfer methods: Try out different transfer methods to discover which one suits your desired effect and style. Each method offers unique characteristics that can enhance the visual appeal of your transferred photo.
-
Practice on smaller pieces: If you’re new to photo transfers, it’s a good idea to practice on smaller pieces of plexiglass before working on larger projects. This will allow you to refine your technique and gain confidence.
-
Take your time: Transferring photos onto plexiglass requires patience and attention to detail. Take your time during each step of the process to ensure a smooth and successful transfer.
By following these tips and techniques, you can master the art of transferring photos onto plexiglass and create stunning pieces of art that showcase your creativity and style.
In the next section, we will explore the finishing touches you can add to your transferred photo to further enhance its appearance. Stay tuned!
Finishing Touches
After successfully transferring the photo onto plexiglass, it’s time to add those finishing touches that will elevate the overall appearance and protect the artwork. These final steps will ensure that your plexiglass photo stands out and remains in pristine condition for years to come.
Adding a Protective Layer
To safeguard your transferred photo, it’s essential to apply a protective layer. This layer will act as a shield against dust, scratches, and UV rays, preserving the image’s colors and clarity. There are several options for protective coatings, such as varnish or sealants specifically designed for plexiglass.
Before applying the protective layer, ensure that the transferred photo is completely dry. Using a clean and soft brush, gently apply the protective coating in thin and even strokes. Be cautious not to over-apply, as it can result in a cloudy or uneven finish. Allow the protective layer to dry completely according to the manufacturer’s instructions.
Enhancing the Photo’s Appearance
If you want to take your plexiglass photo to the next level, consider adding some additional techniques to enhance its appearance. Here are a few ideas:
-
Texture: Experiment with different textures to create a unique and visually appealing effect. You can use various materials like fabric, lace, or even textured paper. Simply place the material on top of the transferred photo and press it gently. This will create a textured pattern that adds depth and interest to the artwork.
-
Painting Over Parts of the Photo: For a more artistic touch, you can selectively paint over certain areas of the transferred photo. This technique allows you to highlight specific elements or add color accents to create a striking contrast. Use acrylic paints and a fine brush to carefully apply the paint, ensuring that it complements the overall composition.
-
Adding Embellishments: Consider incorporating embellishments such as beads, sequins, or small trinkets to further personalize your plexiglass photo. These additions can add a touch of sparkle or create a focal point within the artwork. Use a strong adhesive to secure the embellishments, ensuring they adhere firmly to the plexiglass surface.
Tips for Displaying and Preserving the Finished Plexiglass Photo
Once you have completed all the finishing touches, it’s time to decide how you want to display and preserve your plexiglass photo. Here are some tips to help you make the most of your artwork:
-
Choosing the Right Display Method: Plexiglass photos can be displayed in various ways, depending on your preference and the size of the artwork. You can opt for traditional framing, floating frames, or even create a stand-alone piece by attaching a base to the plexiglass. Consider the overall aesthetic you want to achieve and choose a display method that complements your style.
-
Avoid Direct Sunlight: To prevent fading and discoloration, avoid displaying your plexiglass photo in direct sunlight. Ultraviolet rays can cause the colors to fade over time. Instead, choose a location that receives indirect or diffused light to ensure the longevity of your artwork.
-
Regular Cleaning: Keep your plexiglass photo looking its best by regularly cleaning it with a soft, lint-free cloth. Avoid using harsh chemicals or abrasive materials that can scratch or damage the plexiglass surface. Gently wipe away any dust or smudges to maintain the clarity and vibrancy of the transferred photo.
In conclusion, the finishing touches play a crucial role in enhancing and protecting your transferred photo on plexiglass. By adding a protective layer, experimenting with different techniques, and displaying the artwork thoughtfully, you can create a stunning and long-lasting piece of art. So, unleash your creativity and enjoy the beauty and uniqueness of this art form!
Troubleshooting and Tips
When it comes to transferring photos onto plexiglass, there may be some challenges that you encounter along the way. However, with the right troubleshooting techniques and helpful tips, you can overcome these issues and achieve the best results. Here are some common problems that you may face during the photo transfer process and how to overcome them:
Common issues encountered during the photo transfer process and how to overcome them
-
Bubbling or Wrinkling: One common problem that you may encounter is bubbling or wrinkling of the photo during the transfer process. This can happen if there are air bubbles trapped between the photo and the plexiglass. To avoid this, make sure to smooth out the photo carefully and press it firmly onto the plexiglass. You can also use a brayer or a credit card to remove any air bubbles.
-
Uneven Transfer: Sometimes, the transfer may appear uneven, with certain areas of the photo not adhering properly to the plexiglass. This can be due to uneven application of the transfer medium or inadequate pressure during the transfer process. To fix this issue, ensure that you apply an even layer of the transfer medium and use consistent pressure when pressing the photo onto the plexiglass. You can also try using a heat transfer method for a more even and controlled transfer.
-
Blurred or Distorted Image: If your transferred photo appears blurred or distorted, it may be due to a low-resolution image or improper sizing. To avoid this, always use high-resolution images for better clarity and detail. Additionally, make sure to adjust the size and orientation of the photo to match the plexiglass canvas before transferring. This will help maintain the integrity of the image and prevent any distortion.
-
Adhesion Issues: Sometimes, the transferred photo may not adhere properly to the plexiglass, leading to peeling or flaking. This can occur if the plexiglass surface is not properly prepped or if the transfer medium is not applied evenly. To ensure better adhesion, make sure to clean and prep the plexiglass surface thoroughly before transferring. Additionally, apply a primer or base coat to enhance adhesion. It is also important to follow the instructions of the specific transfer method you are using to achieve optimal results.
Additional tips and tricks for achieving the best results
-
Experiment with Different Transfer Methods: There are various transfer methods available, such as gel medium, Mod Podge, or heat transfer. Each method has its own unique characteristics and results. Don’t be afraid to experiment with different methods to find the one that works best for you and gives you the desired outcome.
-
Practice on Test Pieces: Before transferring your precious photos onto plexiglass, it is advisable to practice on test pieces or scrap plexiglass. This will allow you to familiarize yourself with the process and make any necessary adjustments before working on your final piece.
-
Protect the Transferred Photo: To ensure the longevity of your transferred photo, consider adding a protective layer such as a clear varnish or UV-resistant spray. This will help protect the photo from fading, yellowing, or damage caused by exposure to sunlight or other environmental factors.
-
Get Creative with Additional Techniques: Once you have successfully transferred the photo onto the plexiglass, don’t be afraid to get creative and enhance its appearance further. You can add texture by using various tools or materials, or even paint over parts of the photo to create a unique and artistic effect.
In conclusion, transferring photos onto plexiglass can be a rewarding and creative process. By understanding the materials, preparing the photo and plexiglass properly, and following the right techniques, you can achieve stunning results. Remember to troubleshoot any issues that may arise and implement the tips and tricks mentioned above to ensure the best outcome. So, go ahead and unleash your creativity by trying your hand at this unique art form!
